
The Rule of Thirds in Interior Design: Your Guide to Visually Appealing Spaces
Table of Contents
TLDR: Key Takeaways
- The Core Concept: Imagine overlaying a 3×3 grid (like tic-tac-toe) onto your room or a specific area. The Rule of Thirds uses this grid to guide the placement of elements for better balance and visual flow.
- Avoid the Dead Center: Instead of placing key items smack in the middle, position them along the grid lines or, even better, at the points where the lines intersect (often called “power points”). This creates a more dynamic and engaging feel.
- It Applies Everywhere: Use this guideline for laying out furniture, hanging art, arranging decor, and even balancing the distribution of color and texture throughout your space.
- It’s a Guideline, Not an Iron Law: While incredibly useful, the Rule of Thirds is a tool to help achieve visual harmony, not a strict command. Don’t force it if it feels unnatural or if another arrangement, like symmetry, genuinely serves the space better. Flexibility is key!
- Practice Makes Perfect: Start applying the concept to smaller vignettes, like styling a bookshelf or coffee table, to train your eye. Soon, you’ll feel more confident applying it to entire room layouts.

Have you ever walked into a room and felt an immediate sense of calm and rightness, even if you couldn’t quite put your finger on why? It’s likely that the subtle magic of good design principles was at work. One of the most fundamental, yet profoundly impactful, of these principles is the Rule of Thirds.
Borrowed from the visual arts like painting and photography, I find this guideline absolutely invaluable for creating interiors that feel harmonious and visually engaging. It’s less of a rigid ‘rule’ and more of a powerful compositional technique. Its real strength lies in helping us avoid the static, sometimes predictable feeling that perfect symmetry can create, guiding us towards a more natural sense of balance.
Let’s dive into how you can use this design approach to elevate your own spaces, making them feel more considered and inviting.
Unlock Visual Harmony: Understanding the Rule of Thirds in Interior Design

So, what exactly is the Rule of Thirds? At its core, it’s a compositional guideline designed to create more engaging and balanced visuals. Think of it like this: you mentally divide a space—whether it’s an entire room, a single wall, or even a surface like a coffee table—into nine equal sections.
You achieve this by imagining two horizontal lines and two vertical lines spaced evenly across the area, creating a grid much like a tic-tac-toe board.
The fundamental idea is that placing key elements of your design along these imaginary lines, or particularly at the points where the lines intersect (often called “power points” or “sweet spots”), results in a more balanced, dynamic, and aesthetically pleasing composition than simply centering everything. According to the Interaction Design Foundation, these intersection points act as natural focal areas for the human eye, making placements there feel inherently more interesting.
This concept isn’t exclusive to interior design; its roots trace back centuries to discussions on composition in painting. The term “Rule of Thirds” itself was first documented by John Thomas Smith in his 1797 book “Remarks on Rural Scenery,” (as noted in historical analyses). Smith was referencing earlier ideas, possibly including those discussed by the renowned painter Sir Joshua Reynolds, about achieving balance in art.

These earlier concepts often touched on proportions, like the ratio of light to dark or warm to cold colors, frequently suggesting a pleasing one-third to two-thirds distribution (see discussions on its origin). While initially applied to 2D canvases, these principles translate remarkably well to the three-dimensional world of our homes.
But why does it work so well? Psychologically, our eyes are naturally drawn towards these intersection points rather than the exact geometric center of a composition or space. Placing focal points slightly off-center introduces a subtle energy and movement. It encourages the viewer’s eye to travel through the room more naturally, creating a gentle sense of discovery rather than taking everything in at a single, static glance. It satisfies our brain’s innate desire for order and balance but cleverly avoids the potential predictability and stiffness of perfect symmetry.
As described by designers in sources like The Spruce, the grid acts as a guide for spacing and proportions, helping to create that elusive visual harmony. It’s a tool to achieve balance without making it feel forced or overly calculated. Think of it as creating intentional asymmetry that somehow feels inherently right and pleasing.
This technique helps ensure that the visual weight of objects, colors, and textures is distributed thoughtfully throughout the space, making it feel complete, considered, and ultimately, more comfortable. From my perspective, mastering the Rule of Thirds is like learning a fundamental chord progression in music; it provides a reliable structure upon which you can build more complex and beautiful compositions, tailoring it to the unique rhythm and melody of each individual space.
Visualize the Grid: Applying the Rule of Thirds to Your Space
The first, crucial step in applying the Rule of Thirds is learning to *see* the grid in your own space. This might take a little practice at first, but I promise it becomes more intuitive over time. Stand back and take a good look at the area you’re working with – perhaps it’s your living room wall, your entire bedroom layout viewed from the doorway, or the surface of your mantelpiece.
Now, mentally draw those two horizontal and two vertical lines, dividing the view into nine equal rectangles. If it helps initially, don’t hesitate to lightly sketch it on a photo of your space or even use painter’s tape temporarily on a wall or floor to make the grid tangible.

It’s really important to apply this concept both horizontally and vertically. Consider a wall elevation: where do the lines fall across its height? Where do they fall across its width? For an entire room layout, imagine the grid overlaid on the floor plan. This helps you consider not just individual walls but the overall volume and flow of the space.
Think about how the left, center, and right thirds of the room balance each other. What about the front, middle, and back thirds as you move through it? For example, looking at a wall, the lower horizontal line might align roughly with the height of your sofa’s back or a console table. The upper horizontal line might be a natural place to align the tops of picture frames or mark the transition to crown molding. Vertically, the lines can help you decide where to place a tall floor lamp or define the edge of a major furniture piece like a bookcase.
As suggested by designers featured in Better Homes & Gardens, consider how colors, textures, and even light and shadow compare in each segment of the grid. The shapes within each third can vary, but the goal is to make the overall visual weight feel balanced across the composition. Don’t just think about the walls; consider the floor space too. Properly positioning rugs can significantly impact the balance within the grid. For instance, a rug might occupy the central third of the floor, effectively anchoring a seating arrangement whose elements are placed according to the rule.
Master Furniture Placement Using the Rule of Thirds

Arranging furniture is perhaps one of the most practical and immediately impactful applications of the Rule of Thirds in interior design. Instead of automatically centering your largest piece, like a sofa, on the main wall (a very common instinct!), try aligning one end of it with a vertical grid line.
This simple shift often creates a more dynamic and sophisticated layout. It leaves visual breathing room and provides natural placement opportunities for complementary pieces, like a side table and lamp, which might then align with another line or intersection point. It transforms the arrangement from feeling static and isolated to feeling relational and composed.

Think about using the grid to create functional zones within a larger room. In an open-plan living and dining area, for example, the living room seating might primarily occupy the left two-thirds of the space, while the dining set is thoughtfully positioned within the right third. The imaginary grid lines help delineate these zones naturally, creating definition and flow without needing physical barriers like walls or screens.
As some designers note (Homes and Gardens explores this concept), positioning roughly two-thirds of the furniture grouping towards a focal point like a fireplace or a large window, while leaving the remaining one-third more open, can effectively maintain flow while still emphasizing the room’s key feature.
Key pieces often work exceptionally well when placed *near* the power points (the intersections of the grid lines). An accent chair, a statement floor lamp, a significant piece of sculpture, or even a vibrant plant could be positioned at one of these intersections to draw the eye effectively. This doesn’t mean cramming things onto those exact spots, but rather using them as anchors for visual interest within the broader composition.

Remember that negative space – the empty areas around and between your furniture – is just as important as the objects themselves. The Rule of Thirds helps ensure you distribute furniture effectively, leaving appropriate negative space which contributes significantly to a feeling of balance and prevents the room from feeling overcrowded or chaotic. I believe paying conscious attention to negative space is often what separates a merely furnished room from a thoughtfully designed one; it allows each piece to breathe and be appreciated.
Even in a bedroom, a traditional layout often naturally follows the rule without us realizing it: the bed might occupy the central vertical third of the main wall, while nightstands fall neatly into the bottom left and right thirds of the grid when viewed from the foot of the bed.
Table 1: Rule of Thirds Furniture Placement Ideas
| Furniture Type | Placement Strategy Using Rule of Thirds | Why It Works |
|---|---|---|
| Sofa/Bed | Align one end with a vertical line; or place the main body along a horizontal line (e.g., occupying the lower third visually). | Avoids static centering; creates dynamic balance; allows breathing room and space for complementary items. |
| Accent Chair | Position near an intersection point (power point), perhaps angled slightly towards the main seating. | Creates a natural focal point; adds interest without dominating; encourages conversation flow. |
| Coffee Table | Often centered within a furniture grouping that *itself* adheres to the rule (e.g., relative to a sofa aligned on a third line). | Anchors the conversation area; relates proportionally to surrounding pieces; serves function. |
| Tall Bookcase/Cabinet | Place along a vertical line, potentially occupying two vertical thirds (e.g., middle and top) to emphasize height. | Balances vertical space; draws the eye upward; avoids blocking central sightlines if placed off-center. |
| Console Table | Align its top surface with a horizontal line (often the lower one); potentially center it within one vertical third section (e.g., entryway). | Defines an area (like an entryway); provides a surface balanced with wall decor above it. |
| Area Rug | Place to anchor a zone defined by the grid; might cover the central floor third or specific thirds relevant to the furniture grouping. | Defines functional areas; connects furniture pieces visually within a zone; adds texture/color balance. |
Note: This table offers general guidelines. Always consider the specific room size, shape, architectural features, traffic flow, and your personal needs when arranging furniture. The Rule of Thirds is a tool to guide, not dictate.
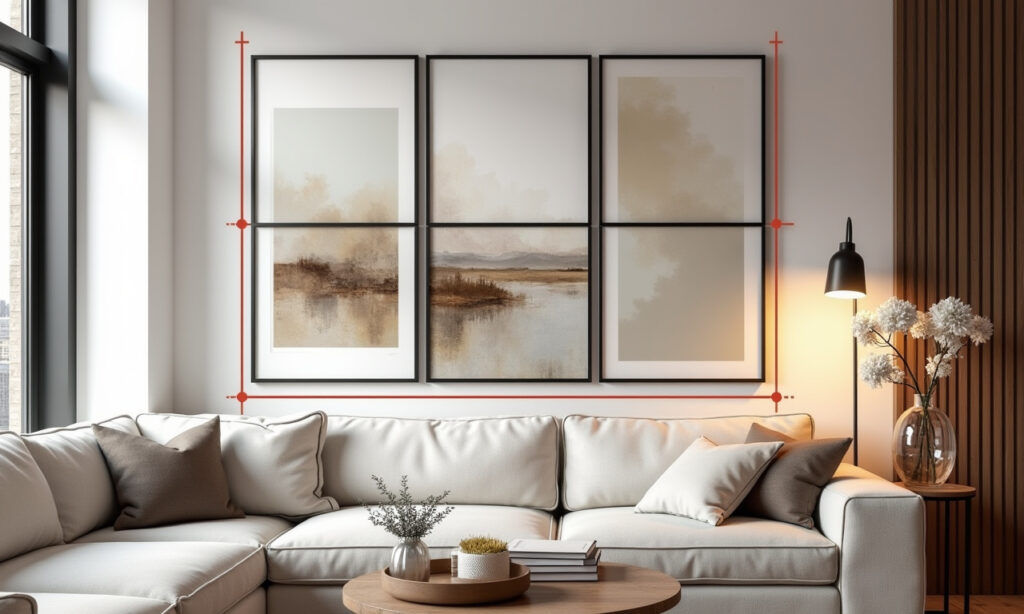
Position Wall Decor and Art Like a Pro with the Rule of Thirds
Hanging artwork and other wall decor is another area where the Rule of Thirds truly shines, transforming walls from mere backdrops into integral, dynamic parts of your overall design scheme. One of the most common decorating mistakes I observe is art hung too high, too low, or pieces that are improperly scaled for the wall or the furniture beneath them. The Rule of Thirds offers a fantastic framework to avoid these issues and get the placement just right.

Instead of automatically centering a picture horizontally on a wall or directly over a sofa, consider shifting it slightly. Try aligning its center with one of the vertical grid lines, or position the main subject *within* the artwork (if it has a clear focal point) on or near an intersection point. This subtle shift can make the composition feel instantly more curated and less predictable.
When hanging art above furniture like a sofa or console table, a helpful guideline related to the Rule of Thirds suggests the artwork should ideally span about two-thirds the width of the furniture piece below it. This creates a pleasing proportional relationship, visually linking the two elements together into a cohesive unit.
Vertically, avoid the temptation to hang art exactly halfway between the top of the furniture and the ceiling. Aiming for the focal point of the art to be near the upper horizontal grid line often feels more balanced and draws the eye appropriately. Alternatively, aligning the bottom edge of the frame with the lower horizontal line (typically leaving about 4-8 inches of clear space above the furniture) can also create a grounded and intentional look.

A general rule of thumb, often cited by galleries and designers, is to hang art so its center point is at average eye level, typically around 57-60 inches (144-152 cm) from the floor (this is a widely accepted standard). However, I think it’s crucial to use the Rule of Thirds grid to *refine* this placement relative to other elements in the room – such as window heights, adjacent furniture, or architectural details – for true visual integration and harmony.
For gallery walls, the Rule of Thirds is incredibly useful for achieving a balanced yet dynamic look that avoids rigid symmetry. Instead of arranging pieces in a perfect grid or symmetrical pattern, think about the overall visual weight and shape of the entire grouping. Arrange the individual pieces so the collective focal point of the gallery wall aligns with an intersection, or distribute the frames more heavily along certain grid lines.

You might create a denser cluster in one area (perhaps occupying the lower-left two-thirds of your imagined grid space on the wall) balanced by sparser placement or smaller pieces elsewhere. Maintaining consistent spacing *between* the frames (e.g., 2-3 inches) brings cohesion, but the overall silhouette of the gallery wall can be beautifully asymmetrical, guided by the underlying grid. I highly recommend laying out the arrangement on the floor first or using painter’s tape outlines on the wall to visualize the balance before making any holes!
Balancing Color, Texture, and Accents Using the Rule of Thirds Grid
Beyond just placing physical objects like furniture and art, the Rule of Thirds can be a surprisingly effective tool for distributing visual weight through the more intangible elements of design: color, texture, and accent pieces. Think about how these elements are spread across your imaginary 3×3 grid. Does one section feel significantly heavier or lighter visually? Does one area demand all the attention, leaving others feeling sparse?
For color, you can loosely apply the principle by considering your palette distribution. This often naturally aligns with the well-known 60-30-10 rule (60% dominant color, 30% secondary color, 10% accent color). Imagine distributing these proportions across the thirds of your room. Perhaps two-thirds of the walls (e.g., the upper and middle horizontal thirds, or the left and center vertical thirds) are painted in a neutral, dominant color.

One wall, perhaps falling neatly within one vertical third, could be an accent wall painted in your secondary color. Pops of the vibrant 10% accent color might then appear in decor items – pillows, vases, throws, art – strategically placed within different grid sections (perhaps near intersection points) to draw the eye and create a pleasing rhythm.
Adding a bold color or a significant feature wall (like distinctive wallpaper or architectural paneling) in just one vertical or horizontal third can create a powerful focal point without overwhelming the entire space. This works best when it’s balanced by more neutral or visually lighter elements in the other two-thirds, allowing the feature to stand out appropriately and feel intentional.
Texture works in a similar way. If you have a lot of rough, heavy texture concentrated in one part of the room (like a large stone fireplace occupying one vertical third), strive to balance it with smoother, lighter textures in the other sections. A plush area rug might anchor the lower third, while smooth painted walls occupy the middle and upper thirds, perhaps punctuated by richly textured curtains hanging along a vertical line, adding softness and vertical interest.

The goal is to ensure a pleasing flow and distribution, preventing any one area from feeling too visually demanding or, conversely, too bland and uniform compared to the others. Use the grid as a mental checklist: are significant textures or pops of color clustered awkwardly in one square, or are they thoughtfully spread to guide the eye across the entire composition?
I believe lighting placement is a crucial, often overlooked, layer in this balancing act. Placing key light sources like pendant lights, floor lamps, or spotlights near grid intersections or along lines can dramatically emphasize those focal points and enhance the overall sense of balance guided by the Rule of Thirds, especially as daylight fades and artificial light takes over. It helps sculpt the space and reinforce the composition you’ve created.
See the Rule of Thirds in Action: Inspiring Interior Examples

Let’s visualize how this principle might play out in different room scenarios to make it more concrete:
- Living Room Example: Imagine a sofa placed so its left end aligns with the left vertical grid line. It occupies the left and center vertical thirds of the main wall. Above it, a large piece of art is hung, but its visual center is shifted slightly off the sofa’s center, landing near the upper-left intersection point of the grid. To the right of the sofa, within the right vertical third, stands a tall, elegant floor lamp positioned near the upper-right intersection, providing vertical balance to the sofa’s horizontal mass and drawing the eye upward. A coffee table sits centered relative to the sofa grouping (anchoring that zone), and an area rug defines the seating area, perhaps covering the central floor third and extending slightly into the adjacent thirds. This arrangement creates a dynamic, asymmetrical balance that feels inviting and visually sophisticated, far more engaging than a perfectly centered layout would be.
- Kitchen Example: Consider a kitchen island. Instead of being rigidly centered in the room’s footprint, it might be positioned to occupy the middle horizontal third, allowing for clear and comfortable workflow aisles in the front and back thirds (or left and right thirds, depending on the kitchen’s orientation). Pendant lights hanging above the island could be positioned so they align with the vertical third lines crossing the island’s length, or perhaps their lowest points align with the upper horizontal grid line of the room’s overall elevation. This draws the eye up and defines that upper space. The countertop itself often naturally aligns near the lower horizontal grid line when viewing the kitchen elevation, creating a strong visual horizon.
- Bedroom Example: A bed is typically the main focal point. While sometimes centered for a sense of formal symmetry (which can be lovely!), applying the rule might involve placing the headboard along the central vertical third of the wall. The nightstands flanking it would then fall naturally into the bottom left and right thirds of the wall grid. Artwork above the bed could be positioned within the upper-middle third. Alternatively, a more asymmetrical arrangement, guided by the rule, might place a single, more substantial lamp on one nightstand (perhaps aligning with a grid line or intersection) and balance it visually with a taller plant or a leaning floor mirror on the other side, distributing the visual weight thoughtfully across the horizontal axis.
These examples illustrate that the grid isn’t about rigid adherence but about using the lines and intersections as powerful guides. It helps create pleasing proportions, intentional focus, and a harmonious balance within a space, often described as a ‘secret weapon’ in achieving professional-looking design.
Avoid These Common Rule of Thirds Mistakes
While the Rule of Thirds is a fantastic tool, like any guideline, it’s easy to misinterpret or misapply. I’ve noticed a few common pitfalls that can actually hinder rather than help achieve a balanced and appealing design. Here are some to watch out for:
- Forcing Perfect Centering (Still!): This is the most fundamental misunderstanding. The primary purpose of using the Rule of Thirds in many situations is specifically to *avoid* the dead center. Placing your main subject exactly in the middle square of the grid usually negates the dynamic, engaging effect the rule aims to achieve.
- Treating It as an Unbreakable Law: Remember, it’s a guideline, a helpful principle, not a commandment etched in stone. Sometimes symmetry *is* the desired effect, especially in very formal spaces like traditional dining rooms or spaces with strong classical architecture. Sometimes the room’s existing features (like an awkwardly placed window) or functional needs simply dictate a different arrangement. Use your judgment – if applying the rule feels awkward, forced, or impractical, don’t do it. Trust your eye and prioritize what feels right for the space.
- Over-Cluttering the Intersections: The “power points” are areas of natural focus, but that doesn’t mean you should pile everything onto them! Use them to place *key* elements strategically, but ensure there’s surrounding negative space (breathing room). Too much visual noise concentrated precisely at these points defeats the purpose of creating clear, intentional focus.
- Ignoring the Vertical Dimension: It’s easy to get caught up thinking only horizontally (left, center, right). Always remember to divide the space vertically (bottom, middle, top) as well. This is crucial for achieving correct heights when hanging art, placing tall furniture effectively, or balancing elements across different levels (e.g., floor decor, tabletop decor, wall decor).
- Applying It Too Rigorously to Minor Details First: Focus on applying the rule to the major compositional elements initially – large furniture pieces (sofa, bed), significant artwork, main color blocks, architectural features. While it *can* be used effectively for styling smaller surfaces like shelves or vignettes, don’t obsess over whether every tiny trinket hits a line perfectly at the expense of the overall room’s composition. Get the big picture right first, then refine the details.
- Misunderstanding Scale and Proportion: The Rule of Thirds works best when the elements themselves are appropriately scaled for the space and for each other. Placing a tiny chair along a third line in a vast, empty room won’t magically create balance if the chair itself is completely dwarfed by the scale of the space. Scale and proportion must be addressed *before* or *in conjunction with* applying the Rule of Thirds for placement.
- Forgetting About Flow and Function: While visual balance is key, don’t let the Rule of Thirds dictate placements that impede traffic flow or make the room difficult to use. A beautifully composed but impractical room isn’t successful design. Function should always work hand-in-hand with aesthetics.
Table 2: Common Rule of Thirds Mistakes & How to Fix Them
| Mistake | Description | Solution |
|---|---|---|
| Dead Center Placement | Placing the main focal point (sofa, major art) exactly in the center square/section, creating a static feel. | Shift the element so its edge or center aligns with a vertical or horizontal line, or position its key feature near an intersection point. |
| Ignoring Vertical Thirds | Only dividing the space left-to-right, neglecting bottom-middle-top divisions for height and wall composition. | Consciously apply the grid vertically when considering hanging heights, tall furniture placement, window treatments, and overall visual balance on walls. |
| Over-Cluttering Intersections | Piling too many items directly onto the four “power points,” creating visual noise instead of focus. | Use intersections for *one* key focal element or the visual center of a small, curated grouping; ensure ample surrounding negative space. |
| Treating it as Rigid Law | Forcing the rule where symmetry, function, or another layout naturally feels or works better for the specific space or style. | Use it as a guideline, not a dictator. Trust your eye, prioritize function and flow. If another layout feels inherently better, go with it. |
| Incorrect Scaling | Applying the rule but using furniture/art that’s fundamentally too small or too large for the room or wall. | Ensure elements are properly scaled for the room and each other *first*, then use the Rule of Thirds for placement guidance. Proportion is paramount. |
| Not Considering Negative Space | Focusing only on placing objects, forgetting the crucial role of empty areas (walls, floor) in achieving balance and preventing clutter. | Use the grid to ensure a balanced distribution of both objects *and* negative space. Allow for visual breathing room around key elements and groupings. |
| Ignoring Flow & Function | Arranging furniture perfectly by the rule but creating awkward traffic paths or unusable areas. | Always consider how the room will be used. Ensure clear pathways and functional arrangements first, then apply the Rule of Thirds to refine the aesthetics. |
Mastering the Rule of Thirds: Your Step-by-Step Guide to Harmonious Interiors

Ready to try applying the Rule of Thirds in your own home? It might sound complex, but mastering it is really about practice and developing your eye for balance and composition. Here’s a simple step-by-step approach you can use for any room or area:
- Assess Your Space & Goals: Stand back and really *look* at the room or the specific area (like one wall) you want to design or rearrange. Take note of existing architectural features, windows, doors, and light sources. What is the main function of this space? What feeling do you want to evoke? What elements do you want to be the focal point(s)?
- Visualize the Grid: Mentally overlay the 3×3 grid onto the space. Remember to do this for both the floor plan (thinking about horizontal distribution) and the main walls (considering vertical distribution). Take note of where the lines fall and, importantly, where the four intersection points land. These are your key guides.
- Place Anchor Furniture First: Start by positioning your largest, most significant furniture pieces – usually the sofa in a living room, the bed in a bedroom, or a large cabinet or dining table. Try aligning them with grid lines (e.g., the front edge of a sofa along the lower horizontal line, or one end of the sofa along a vertical line) or positioning their visual weight within certain thirds. Generally, try to avoid placing the main mass directly in the dead center of the room or wall unless aiming for strict formality.
- Layer in Secondary Pieces: Next, add in the supporting cast: accent chairs, side tables, coffee tables, ottomans, lamps, etc. Use the grid to place these pieces in relation to the anchor items and to balance the overall composition across the different thirds. Think about creating functional groupings (like a conversation area or a reading nook) that feel balanced within the grid structure.
- Position Wall Decor Thoughtfully: Now address the walls. Hang artwork, mirrors, and shelves using the grid lines and intersections as guides for placement. Consider the scale of the decor relative to the furniture below it (remember the two-thirds width guideline) and the wall itself. Use the eye-level guideline (around 57-60 inches to the center of the art) as a starting point, but adjust based on the grid, ceiling height, and surrounding elements for a cohesive look.
- Distribute Color, Texture & Light: Step back again. Assess the visual weight of colors and textures across the grid. Does one area feel too heavy, too busy, or too empty? Use accessories, textiles (rugs, pillows, throws), plants, and potentially paint strategically to ensure harmony and visual interest are distributed throughout the thirds. Don’t forget lighting – place lamps near key points (like intersections or along lines) to enhance focus and balance, especially in the evening.
- Review, Refine, and Live With It: Live with the arrangement for a little while. How does it *feel* to be in the space? Does the room flow well? Is your eye naturally guided through the space in a pleasing way? Does it function well for your daily life? Don’t be afraid to tweak placements. The ultimate goal is a space that feels right and works well *for you*, using the Rule of Thirds as your trusted guide, not an inflexible dictator.
I truly believe that the more you consciously practice visualizing and applying this grid, even in small ways like arranging items on a shelf or setting a table, the more intuitive and effortless it will become. Start small, build confidence, and most importantly, enjoy the process of creating more balanced, beautiful, and personally resonant spaces!
Conclusions: Actionable Steps to Balanced Design
The Rule of Thirds is a powerful yet surprisingly simple guideline, borrowed from the rich traditions of art and photography, that can dramatically improve the visual appeal and sense of harmony in your interior spaces. By consciously moving away from predictable, centered layouts and embracing intentional asymmetry guided by the 3×3 grid, you can create rooms that feel more dynamic, engaging, and professionally considered.

It’s fundamentally about creating visual interest that guides the eye naturally and comfortably through the space, resulting in a composition that feels both balanced and alive. I find it’s one of the quickest ways to elevate a room from simply ‘furnished’ to ‘designed’.
Here are your actionable takeaways to start implementing this principle today:
- Embrace the Grid Mentality: Make it a habit to consciously visualize the 3×3 grid in every space you design, evaluate, or even just admire. Practice seeing the lines and intersections.
- Focus on Strategic Focal Points: Use the grid lines and especially the four intersections (“power points”) to strategically position your most important furniture pieces, artwork, statement lighting, and key decor items. Avoid the dead center unless symmetry is the specific goal.
- Balance the Visual Weight: Apply the principle not just to object placement but also to the thoughtful distribution of color, texture, light, pattern, and even negative space across the different thirds of your room or wall composition.
- Start Big, Refine Small: Apply the rule to major elements like sofas, beds, large rugs, and significant art first to establish the main compositional structure. Then use it to guide the placement of smaller items and groupings for a cohesive and layered feel.
- Know When to Break the Rule: Remember it’s a tool, not a restriction. Trust your eye, consider the room’s function and architecture, and adapt as needed. Sometimes symmetry or another approach might be better suited to the space or your personal style.
- Practice Makes Intuitive: The key to mastery is consistent practice. Start styling smaller areas like bookshelves, console tables, or coffee table vignettes using the grid to train your eye for balance and proportion. This builds confidence for tackling larger layouts.
By incorporating the Rule of Thirds into your design thinking, you’ll be well on your way to creating spaces that are not just functional, but truly captivating, harmonious, and reflect a deeper understanding of what makes a composition visually successful. Happy designing!